
Nothing could be worse than seeing the “Storage Almost Full” message pop up on the iPad as you try to download an app or a media file. Here’s everything you can do to clean iPad memory and retrieve some of those precious gigabytes.
Back in 2007 when the very first iPhone came out, it boasted a storage capacity that started at 4GB, which was sufficient for its time. Over the years, with the resolution of mobile devices increasing, and the quality of apps available, the need for more storage has been growing steadily. The larger Retina HD display of the Apple iPad is capable of stunning visuals, which converts directly into large media files, leaving you wanting more storage space at times.
Unlike most Android tablets out there, the Apple iPad comes in preset storage variants, and there is no feature for expandable storage. If you purchased the basic 32GB version of the iPad, you’re probably regretting it now that the storage space is almost at full capacity, and there does not seem to be a way to expand it. Fret not, you aren’t the only sad Apple iPad user out there with this grave issue, and there are great ways to go around the limited storage space on your iPad.
First Things First – Check the iPad Storage
Before diving into the different solutions to free up space on your iPad, you need to take a step back and look at the number first. iPadOS comes with a detailed section that highlights the iPad Storage, breaking things down into a bar graph representing the amount of storage taken up by Apps, Photos, the System, Messages, and everything else.
To find out more, you need to launch the Settings app, navigate to the General tab, and then open iPad Storage to get into the details. The screen will give you a general idea of how the data on the iPad occupy much storage space, and how much is still available for you to use. Additionally, the same screen will also give you an overview of the storage space available on your iCloud account. By default Apple, offers 5GB of free storage to all iCloud users, which can be bumped up with a monthly subscription plan.
Offload Apps
There may be times when you might not need to have an app installed at all times, but the app data (login credentials, downloads, and app history) is something you don’t want to let go of. For these instances, Apple has added the ability to offload apps from the iPad and iPhone, while reclaims the space used by the app. However, this is different from removing the app entirely, since you still get to keep the documents and data of the app.

- Open the Settings app from the iPad home screen.
- Go to the General tab and tap on the iPad Storage section.
- Find the list of apps and open the one you want to offload.
- Press the Offload App button and confirm your action.
The app will be removed from the iPad, while preserving the internal files and settings so that you can reinstall it from the App Store with a single tap.
Delete App Data
In most cases, the app you are using may not be the real hoarder of storage space, but the media files, documents, and data you have stored in it could be. While you may not want to let go of a useful app entirely, there is the option to shed some of the dead weight from within the app, which you can do from the iPad Storage menu.

- Open the Settings app from the iPad home screen.
- Go to the General tab and tap on the iPad Storage section.
- Open the app from the list you want to delete some of the app data for.
- On the app menu screen, find the files at the bottom and press the Edit button.
- Swipe left on the file, press the Delete button, and confirm your action.
Perform the same action for all of the other files you want to delete from within the app, which will immediately free up space from the system storage.
Use iCloud to Store Data
Ever since iOS 9, Apple has put cloud storage into focus, with iCloud being the epicenter of all personal data storage across the entire ecosystem of its iDevices. If you have been relying on local storage for all your photos, videos, documents, and app data, it might be time to sync it all up with Apple iCloud and relieve the iPad of some burden.
By default, you get 5GB worth of iCloud data storage for free, which can be expanded with a monthly subscription from Apple. You can start by enabling Photos to be backed up directly to the iCloud account, where the bulk of storage space goes for most users.
- Launch the Settings app on the iPad.
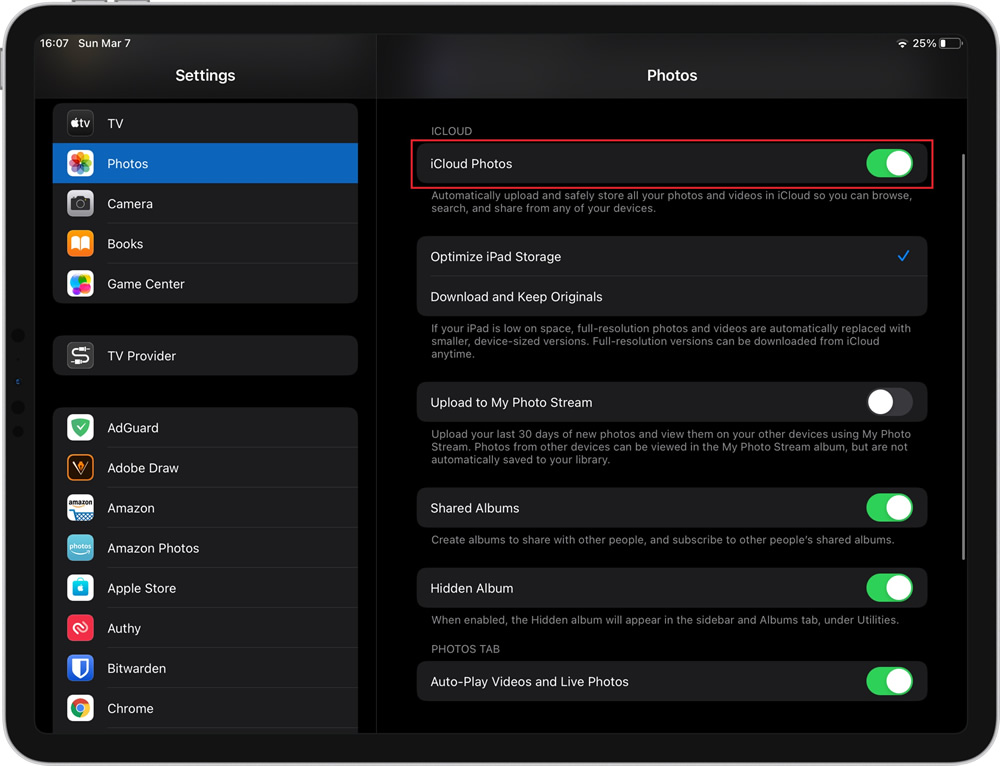
- Scroll down to find Photos in the left tab and open it.
- Press the toggle switch next to iCloud Photos to enable it.
- Furthermore, enable the option to “Optimize iPad Storage”, which allows you to compress the images on the iPad, while keeping the original files stored in full resolution on the iCloud.
Additionally, you also have the option to handpick other aspects of the iPad data that is synced with iCloud, and here’s how you do it:
- Open the Settings app and tap on the User Profile right at the top-left corner.
- Tap on the iCloud menu, which will give you a detailed overview of what data takes up space on the iCloud account.
- Several apps and services are listed below, each of which you can sync to iCloud by pressing the toggle switch right next to them.
- Additionally, you have the option to Manage Storage button to shed some of the dead weight from the iCloud storage too.
Clear Safari Website Data
It may not seem like you’re saving much when clearing out the gunk from your web browser to reclaim lost storage space. However, for power users who browse the internet for hours each day, bit by bit, the Safari web browser can become a honeypot of web data that eats away at the iPad storage. For instance, we tried cleaning the website data for our iPad and were surprised to see upwards of 800MB being used by various websites.

- Open the Settings app on the iPad.
- Navigate to the Safari app on the left sidebar.
- Scroll down to find the Advanced tab, and then open the Website Data tab.
- Wait for the data to load, which should display the total website data stored on the device.
- Tap on Remove All Website Data and confirm your action to continue.
You even have the option to selectively delete app data by swiping left on the website address and pressing the Delete button to confirm.
Add External Storage
One of the biggest gripes you could have with the Apple ecosystem is its limitations when speaking of expandable storage. While the Apple iPad is limited to the onboard storage you purchased it with, there is the option to add some external storage space.
There are special thumb drives designed to allow users to move data across mobile devices, with some even having the Lighting cable port. While the functionality of such removable pen drives for iPad is limited to only data such as photos and documents, it might be all you need to keep the iPad storage lightweight, while making it effortlessly simple to move data across from the iPad.
We recommend using the SanDisk iXpand Flash Drive Luxe, which comes with the Apple Lightning port on one end and the USB-C port on the other. Additionally, the iPad thumb drive comes with its very own iXpand Drive app, making it easier for you to create regular automatic backups, and although it isn’t perfect, it gets the job done.
Get the SanDisk iXpand Flash Drive Luxe
Disable Photo Stream
To offer you a more seamless user experience when using multiple iDevices, Apple has added a feature to make your iPhone and iPad photos available across different devices. When enabled, “My Photo Stream” allows you to view the pictures and videos simultaneously on the iPad and the iPhone too, which takes up storage space on both these devices. The photos are not stored on iCloud, and take up space on the device itself, which is why turning off the feature can save you plenty of megabytes or even gigabytes.

- Open the Settings app on the iPad from the home screen.
- Scroll down through the left sidebar to find the Photos app.
- Find My Photo Stream and press the toggle switch next to it to disable the feature.
If you had the feature enabled, turning it off will remove the My Photo Stream folder from the Photos app, along with its contents.
Use Google Photos
While Apple iCloud has stuck to its guns with 5GB of free storage, Google was far more accommodating to its Google Photos users. All the way up until the year 2020, users were allowed to upload unlimited photos and videos, at no added charges, while the images being optimized (compressed) for storage. Although Google is abandoning this free-for-all concept due to the storage crisis that it faces, you still get 15GB of free storage per Google account, which is three times what Apple iCloud offers.

- Download the Google Photos app from the App Store.
- Log in with your Google account.
- Tap on the user profile in the top-right corner and select the Photos settings tab.
- Select Back up & sync from the list and press the toggle switch to enable the feature.
All your photos in the iPad Photos app will be synced with the Google account, which can then be viewed across different platforms with ease.
Flush Out Old Messages
The Messages app for iOS and macOS is seamless and a breeze to use, and if that’s where most of your conversations happen on the iPad, it can also be a space-hoarding beast. With plenty of media shared all the time during texting, the Messages app could be harboring gigabytes of your iPad data with media and files you don’t even need. Rather than cherry-picking the messages you keep, iPadOS offers you the ability to choose how long you hold the messages on the iDevice.

- Launch Settings and scroll down to find the Messages app.
- On the right side of the screen, find the Keep Messages tab.
- Choose to keep messages for 30 Days, 1 Year, or Forever, by tapping on it.
Reduce Camera Photos Size
The iPhone and iPad are known to possess not just great hardware for the camera, but even better software that brings it all together. To do what it does best, the iPad clicks multiple pictures of the same subject, and stitches them together to create different effects such as the Portrait Mode, Panorama, and others. However, storing two versions of the same image means that twice the space is taken up, which isn’t great when your iPad storage is already filled to the brim.

- Open the Settings app on the iPad.
- On the sidebar, find the Camera app and open it.
- Press the toggle switch next to Keep Normal Photo to disable it.
Optimize iPad Storage with iMobie PhoneClean
There isn’t a short supply of iOS and iPadOS cleaning tools that have been specifically designed to rev up the performance of your device, and reclaim some essential storage space. Out of the sea of options available, we have shortlisted iMobie PhoneClean as the preferred pick for this particular guide, since it is not only available on a free trial to test out, but supports both Windows as well as macOS systems.
- Download and install the PhoneClean app on your computer (Download Link).
- Connect the iPad to the computer using a USB cable and launch the PhoneClean app.
- You can begin by scanning the iPad storage, so click on the Scan button to begin.
- This will launch the Quick Clean feature, which analyzes your iPad storage and provides a quick breakdown of what items you can immediately remove for a safe cleanup.

- Apart from scanning the entire device, you can also choose what items PhoneClean scans by pressing the Settings icon next to the connected iDevice name.
- The Silent Clean option allows you to flush out junk files, crash logs, temporary files, artwork caches, and other data.

- Another option on the list is Internet Clean, which allows you to scan through saved bookmarks, cached website data, webmail junk, and more.

- There is also the inclusion of Privacy Clean that helps you wash out old messages, attachments, and other sensitive data, while System Clean focuses more on unused app data and notifications.
- Lastly, Mobie PhoneClean also comes with the option to Erase Clean the iPad, which essentially removes all content from the device, just like a factory reset would.
Apart from these features, the app comes with an entire Toolbox which allows you to selectively clean out items such as contacts, photos, media files, app data, notes, and more.
Final Words
Several users have reported that the Other section takes up a significant portion of the overall iPad storage space. While Apple does not offer an easy way to find out the contents of the Other section in the storage app, it is mostly packed with cached data, settings, messages, voice memos, and more trash files. Even after using all of the steps highlighted above, if you cannot get rid of the “iPad Almost Full” message from popping up every time you try to download a file or install an app, we recommend you consider performing a factory reset.
We cover everything about the Apple iPad extensively here, everything from a guide to retrieve iPad Notes data, to fix the frozen iPad the easy way. If you have deleted some apps or notes from your iPad, but later want to recover them back, here are top data recovery tools to help you out.


Add comment